Showing posts with label Patti Weigel. Show all posts
Showing posts with label Patti Weigel. Show all posts
A Walk Down Paisley Road
These papers by Prima Marketing have got to be some of my favorite ever! Tammy really hit it out of the park with this this Deluxe Kit. The colors are so lush.The embellies are so sparkly and fun. These pages almost made themselves! I just love the way the florals all works so splendidly together!

I'd been wanting to scrap this photo for so long and the colors in this paper matched her little jumper perfectly. I just love the lines on this paper ~ it makes journaling a snap!

I think this last page is my favorite out of the bunch. I very rarely cut my photos into shapes but I really wanted to retain the feel of a flower that this paper had. So I made my messy little sweetie the center of the flower by matting her photo in 1/4 inch larger crircles.

I used the scraps to make a couple of cards.

Lost in Pixie-land?
Wow, it has been forever since I posted but real life intruded and I can't say that I liked having to work 12 hour days for the past 2 months! But I am getting back to part time and this adorarable kit by Cosmo Cricket was my first grab. PixieLicious is the easiest kit I have ever worked with! Every sheet of paper in this kit has the most amazing color and the embellies Tammy has put with it are simply divine! LOVE LOVE, LOVE the color in this first layout!

The strips of titles in this kit make it super easy to whip together a page. I put these three pages together in one afternoon!

For this last page, I wanted to see if I could make this paper look a little less girly and us it for one of my sons layouts. I used a strip of aqua patterned paper I had laying around to tone down the girly feel of this paper and I think it turned out great!

Kaiser Kraft ~So Kool!
When I saw this beautiful paper from Kaiser Kraft called Prairie Lane all I could think of was snowflakes. I know - how did I connect the beautiful browns and blues in this set with snow, right? I can't explain it but that's exactly what I did.

This layout is very textural. I used a fanfold technique and placed the circular "fan" between two sheets of cardstock. There is a tutorial video at the end of this post if you would like to see how I accomplished this. Below are a few more close ups of the layout.

The layout ended up being about a half an inch thick. I haven't tried putting it in a page protector yet, but if it doesn't I will just have to frame it! It looks complicated but in all actuality is was very simple!

Texture, Texture Everywhere!
Okay so here's my deal - I love, love, love Graphic 45's new line Halloween in Wonderland. That said, I am finding it incredibly hard to actually cut the paper. Seriously, I think most of it would be beautiful just framed! So for this layout, I used the entire sheet, added a framed photo and then just used the paper itself, to add dimension.

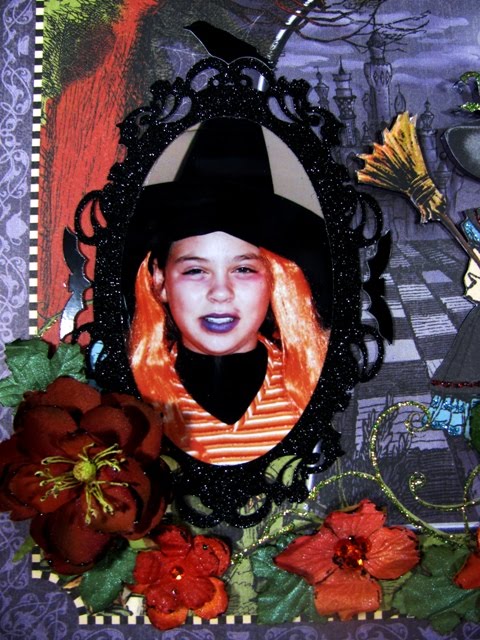
The frame is cut from black glitter paper from the Happy Hauntings Cricut cartridge. I used some black metallic paper for the crow at the top and the bats at the sides of the frame, just to set them off a bit.

This paper has beautiful leaves and flowers all over it. Because I wanted to show off the paper, I cut around the top half of the teapot and Alice, added coordinating paper to the back of the page, and pop dotted them up. I used Prima flowers and leaves all over this layout matching the flowers printed on the page. Before adhering them, I misted them all with Tattered Angels Glimmer Mist, giving them an amazing shimmer. I also used alot of Ranger Stickles on this layout.

Here is a shot to show how textural this layout is. In the end, I did have to cut this stunning paper but every element is in the original location, just popped for texture.
Halloween in Wonderland ~ Spellbinding
Graphic 45 has cast a spell on me with this amazing line of magial papers! Tammy has bound the spell even further by putting together the Halloween in Wonderland~ Deluxe Scrapbook Kit! I actually had to call my daughter in to make me cut into the first sheet of paper. Seriously - I just wanted to save it all! But how could I, Right? So for my first projects from this enchanting kit I had to go with the Mad Hatter theme.

I used the Cricut Paper Doll Dress Up cartridge and my Gypsy to weld two "top hats" together to cut out the base of this card. The sheet of playing cards in this kit are so much fun and I used one to tuck in the ribbon hat band .

Here is a view from the side so you can see how it opens and all the dimension this fun card has.

Here's another one but on a 5.75 by 5.75 card. I love how the rabbit is looking at his watch on this playing card. It goes perfectly with the sentiment on the inside...

See what I mean. I have a stamp set that says this but the greeting looked so small on this big card. Instead, I made a rubon with my inkjet printer and a transparency sheet. Stay tuned for more projects with this amazing paper!
Basic Grey Capella - A bright Star!
I am a a huge fan of Wikipedia and it says that "Capella is the sixth brightest star in the night sky." Well I think that Capella is one of the brightest stars in the Basic Grey line. The Cappella~ Deluxe Scrapbook Kit~ KOTM is simply lovely. I Ilove the muted and diverse colors in this kit and the embellishments? Forgetaboutit!

When my oldest got Chicken Pox, she got them pretty bad! Whenever she saw this picture in the photo album she would say, "Baby got the Chicken Pops". So there you go, the perfect title which is cut from the Cricut Storybook Cartridge.

Don't you just love this adorable chicken cut at 6 inches from the Cricut Animal Kingdom cartridge? I added a big distressed bow to dress her up a bit!

The photo mat is pop dotted on three sides so this journaling tag can slide right in. Don't tell anyone, but it is actually some leftover packaging from some prima flowers I got at Lil' Lambs. I finished off the other side with some matching bazzil and added the tab cut from the Cricut Fabulous Finds cartridge. I am a frugal scrapper and if I think I might be able to use packaging on a page, I keep it!

Can you believe that this layout is from the same kit? Such a different feel with the black base. This title is cut from the Hannah Montana cartridge and welded together with my Gypsy.

These circles are punched at 1.5 inches out of the bits and pieces left over from both layouts. The flowers were originally gold. I wanted to include silver in this layout, so I saturated the flowers with Tsukineko Shimmer Spritz. It is hard to see here but the original gold color shows through in places - so pretty. I also used some Ranger Stickles - Icicle all over this layout! Love me some bling.

The journaling tag is one I had lying around from Fancy Pants. I trimmed it to an oval shape, then placed the amazing Prima Say It in Pearls Corner on top. If you haven't tried these beautiful stick ons, you are really missing out. They make any layout really special.

And with the left overs I made this card. The monogram is from Fancy Pants. A super simple thank you for a very special sister in law.
Fun Summer Colors - Basic Grey Green at Heart
Have you ever opened a pack of paper and an image immediately pops in to your head? This is exactly what happened when I received BasicGrey~ Green at Heart~ Deluxe Scrapbook Kit~ KOTM . The sherberty orange color just screamed popsicle to me! So this was my very first creation.

Just llike Cheryl said in the previous post, Basic Grey and JustRight stamps are a match made in heaven. I love the ability to mix and match the frames and verses with different color inks. Because the acrylic blocks are clear, they are also incredibly easy to line up. I used the just right stamps on all of my projects today. On this 5.75" x 5.75" card I used the Cricut Doodlecharms Cartridge to cut the popsicle at 3". Some checked ribbon, three crystals and a bit of stickles make this card pop!

The large sentiments in the JustRite~ Cherish the Memories Nested Sentiments Set; Verse make the perfect scrapbook titles. This page uses the beautiful ribbon and flowers included with this great kit. I am a fan of quick and easy scrapbook pages so I used my favorite EK punch "Threading Water" and a few buttons from my stash to finish off this page.

This A4 card is probably one of my favorites I've ever made. I cut the flower pot twice from the Cricut Walk In My Garden at two inches. Then I cut the "rim" of the pot off one, inked both pieces and pop dotted the rim to give it the illusion of a real pot. I cut three strips of card stock about 2 inches by 1/2 inches, and glued them all together to creat a "stiff stem" to hold the Prima Rose upright so when you open the card ...

and tuck it behind the pop dotted strip and sentiment, it sits up like a perfectly blooming rose!

For this last card I cut five flower shapes, starting at 3.5 inches and getting smaller by 1/2 inch, out of white cardstock. I saturated each one with Tattered Angels Glimmer Mist Chalk Board Banana Pudding. This stuff has a beautiful chalky finish with the finest glitter I have ever seen. The look is amazing. After I soaking them good, I crumpled them up and let them sit for about 10 minutes. I un-rumpled them, layered them and hit them with a heat gun to "set" the shape. A large brad holds it together.

Don't you just love the the beautiful colors in this kit.
Max & Whiskers - Who Knew?
When I recieved this Basic Grey Kit from Tammy, I wasn't sure how I was going to use it, seriously! We have a cat, so the first layout was a cinch! After that, I was stumped. Then I remembered that I had dressed up our 1st son as a Dalmation for his first halloween and Bingo, layout is born.

Then I was creating a personal layout with one of the new Cricut Lite cartridges (Bis for Boy) and remembered this paper. I think this layout is just so super cute!

And finally, I finished up with a card using my favorite Cricut Cartridge, Create a Critter.

Wow three layouts and a couple of cards. Pretty good for being stymied on how to proceed!
Sweet Love
Sometimes you run across papers that are so pretty you just don't need to do alot to them to create beautifule layouts. That is the case with Little Yellow Bicycle Sweet Love Paper Kit The papers in this keit are shimmery with just a hint of glitter. So Pretty!


Finishing up my Pink Paislee Queen Bee
Like I said in the last post I just adore this KOTM and I am a little sad that all of my Pink Paislee ~ Queen Bee Delux kit is gone. :( I was able to make another layout using the Cricut Create a Critter and the Keystone Font Cartridge. The embelishments in this kit are amazing, especial the Prima Say it in Pearls and Roses!

I used the Cricut Create a Critter to cut the frame, bee and hive.

I love the Pink Paislee Expressions Chipboard Alpha Stickers and although as with any chipboard stickers there wasn't enough to say everything I wanted, I was able to match the font fairly well using the Cricut Keystone font.

I just love the way this layout turned out. Although the embellies are a bit feminine, the colors just felt masculine so it worked out perfect for my sweet little son!

I took all the left over bits and made this card.

I used the Cricut Preserves Cartridge for the pear. Isn't it just the cutest? The sentiment is from the Clear Dollar set Tangy Trio. I spritzed the Prima Leaf with Psst... Shimmer Spritz Gold to add just a bit of glitz and finished it off with a cream colored sateen bow!
Pink Paisley ~ Queen Bee
Luscious ~ that is the only way I can describe the Pink Paislee ~Queen Bee ~Deluxe Scrapbook Kit. The colors are muted and lovely and the embellishments are divine! As I was opening the Prima Debutante Stem I noticed how cool the packaging was and couldn't bear to just toss it.

Instead, I cleaned the sticker off of the back, cut a heart out the Honeycomb Paper and adhered it to the back with spray glue and cut the excess off.

Just look how pretty it looks with the Pink Paislee Expressions Chipboard Alpha Stickers on it. I love the distressed look of these beautiful letters.

I like to use my Xyron sticker maker on thin ribbon like the pretty dingle ball ribbon included in this kit. It makes it a snap to put down.

And just look how beautiful it all came together. I cant wait to use the rest of this beautiful paper and all the beautiful embellishments!

Leaps and Bounds!
Here's a super simple layout using one of the gorgeous papers from the Webster's Pages~ Lullaby Lane~ Deluxe Scrapbook Kit. These papers are so detailed that your really only have to add some pictures and you would have a wonderful layout.

I used all of the big prima flowers in this kit on an earlier layout so I wanted to show you that you can make your own blooms pretty easily.

I cut flowers shapes (3 at 1.5 inches and 2 at 1 inch for each flower) from the bazzill bling cardstock included in this kit. After punching a hole in the center of each flower, I sprayed each one with Tattered Angles Glimmer Mist until completely saturated and crumpled them up, tightly. I un-crumpled and layered five flowers (2 smaller on top) and secured with a brad. Then I foofed them till I liked the way they looked. I used a heat gun to "set" each flower and attached a Prima Grape leaf that I had misted with glimmer mist. Although they sound like a lot of work they are really super simply and add so much dimension to your page. Go ahead and give them a try.
Still playin' in the Cosmo Cricket Garden
Okay, I am still playing in the garden and having a blast. This Cosmo Cricket Garden Variety 6 x 6 pad is just the funnest paper ever! Here are two quick layouts I finished up this week. On the first one I used 2 sheets of Bo Bunny Double Dot for the base.

I cut a scallop shape out of the yellow and layered it over the blue. I will use the cut out on another layout – waste not, want not! The grass is cut from the Zooballoo and the font is from the All Mixed Up cartridge.

I just love these Chicks from the Garden Varitey Ready Set Chip sticker sheet. I also love love love the 6 x 6 red paper with the chicks on it! And I think the fat little bows are the perfect accent to finish off this super simple layout!

This second layout was super simple too! I love the all green color scheme. My ugly avocado green bath tub actually looks good on this layout! LOL

The background paper is from DCWV Garden party stack. It coordinates beautifully with the 6 x6 polka dot paper from the Garden Variety stack. And the cute little pea chip board stickers and boarder ~ forgetaboutit!

The title is cut from the New Arrival Cartridge and the lace boarder is a Fiskars punch. Green organdy ribbon , Prima Esprites and a bit of green Stickles finishes this layout. Super simple, super cute!
Subscribe to:
Posts (Atom)


 Posts
Posts


